
In this MainStage tutorial, we’ll look at how to assign a pitch bend wheel to EXS24 instruments.
After you’ve set up your controller assignments in your MainStage layout, return to EDIT mode and click on your pitch been wheel icon. It should appear as below with a blue outline.

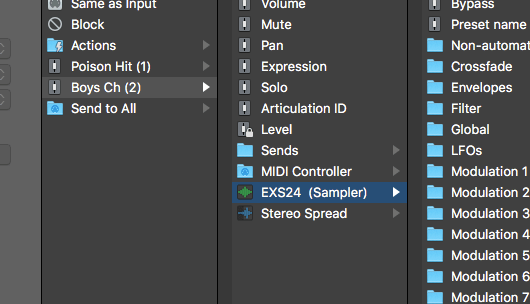
Next, in the screen control inspector select the tab labeled “unmapped”, then select the name of the channel strip you wish to affect. In this case, we’ll be looking to use the pitch bend wheel on the channel strip labeled “Boys Ch”.

In the next column, highlight the line labeled “EXS24 (Sampler)” as this patch is an EXS24 instrument:
Navigate down until you see the folder labeled “Pitch” and highlight that:

In the next column to the right, select “Fine Tune”:

On the left side of the Screen Control Inspector, you can adjust the range of the pitch bend in the boxes labeled “Range Max” and “Range Min”. I suggest starting with +10 cents and -10 cents respectively, though you can adjust to suit your needs and your taste.
After moving the pitch been wheel while holding a note in the EXS24 instrument to test and verify that it’s working, save the concert.
It’s that easy! For another MainStage tutorial on how to adjust tunings of individual EXS24 samples, click here.
As always, feel free to contact me with any questions. I’m always happy to help!
jeff@mardermusic.com
+1.917.338.7427